What Are Child Themes and Why You Absolutely Need One
A Step-by-Step Guide to Manually Creating Your First WordPress Child Theme
Jan
Strategic Foundations: A Step-by-Step Guide to Manually Creating Your First WordPress Child Theme
In the dynamic landscape of web development, a WordPress site is rarely a static entity. It evolves, adapts, and necessitates constant refinement to meet strategic objectives. Yet, for countless site owners and even seasoned developers, the act of customization often carries a silent, inherent risk: the potential loss of bespoke modifications with every parent theme update.
This article from DebugPress.com is engineered to equip you with the foundational knowledge and precise, step-by-step instructions required to circumvent this pervasive challenge. We delve into the strategic imperative of WordPress child themes, demonstrating not just how to create one manually, but why this approach is unequivocally the superior method for ensuring the resilience, scalability, and long-term stability of your digital presence. By understanding the underlying architecture and performing a manual setup, you gain unparalleled control and a deeper comprehension crucial for advanced deployments in late 2025 and beyond.
Key Takeaways for Strategic WordPress Development
- Strategic Resilience: Child themes are your primary defense against losing customizations during parent theme updates, ensuring long-term site stability and reducing operational risk.
- Architectural Efficiency: They promote modularity and clean code separation, enabling agile development and easier troubleshooting.
- Empowered Customization: Gain granular control over your site’s aesthetics and functionality without altering core theme files, preserving upgrade paths.
- Foundational Knowledge: Understanding manual creation builds a deeper comprehension of WordPress theme architecture, crucial for advanced strategic deployments.
- Scalability & Control: Lay the groundwork for a robust, customizable WordPress presence, adaptable to future strategic shifts and design evolutions.
1. The Strategic Imperative: Why Child Themes Are Non-Negotiable
At the core of robust WordPress site management lies a fundamental principle: never directly modify a parent theme’s core files. This isn’t merely a suggestion; it’s a critical strategic directive that underpins the security, maintainability, and future viability of your website. Understanding this imperative is the first step toward becoming a truly empowered WordPress professional.
The Peril of Direct Parent Theme Modification
Imagine investing hours into custom CSS, intricate PHP functions, or bespoke template adjustments directly within your parent theme. Now, envision a critical security update or a feature enhancement released by the theme developer. To apply these vital updates, you’re forced into a devastating choice: either forgo the update, leaving your site vulnerable or feature-deficient, or proceed with the update and witness all your precious customizations vanish without a trace. This scenario is not hypothetical; it’s a common and frustrating reality for those who bypass child themes.
Direct modification introduces significant operational risk. It creates a technical debt that accumulates over time, making future updates a perilous endeavor and severely hindering your ability to adapt to new requirements or security threats effectively. Furthermore, it complicates troubleshooting, as differentiating between parent theme issues and custom code errors becomes a nightmare.
Security, Maintainability, and Future-Proofing Your Digital Presence
Child themes serve as an impenetrable barrier, separating your unique customizations from the parent theme’s core. This separation brings a multitude of strategic advantages:
- Enhanced Security: By allowing parent theme updates to be applied safely, you ensure your site benefits from the latest security patches without compromise. An un-updated parent theme is a common vector for exploits.
- Streamlined Maintainability: Troubleshooting becomes significantly simpler. If an issue arises, you can quickly determine if it stems from the parent theme (by temporarily deactivating the child theme) or from your custom code. Your modifications are isolated, preventing unintended side effects on the core theme.
- Future-Proofing: As your website evolves, so will its design and functionality. A child theme ensures that any changes you make today are preserved through tomorrow’s updates, allowing for continuous, agile development and adaptation to new strategic shifts without constant re-implementation of custom code.
- Collaboration: For development teams, child themes facilitate better collaboration by clearly demarcating core theme functionalities from project-specific customizations.
The Definitive Choice: Always Opt for a Child Theme
The question of “when to use a child theme vs. direct customization” has one definitive answer for any intermediate to advanced WordPress professional: always use a child theme for any and all modifications. Whether it’s a single line of CSS or a complex new custom post type, every customization belongs within a child theme. This practice is not just a best practice; it is the fundamental architectural strategy for building resilient and maintainable WordPress sites in the modern web era.
Consider this: Over 30% of WordPress sites experience issues with customizations being overwritten during theme updates, highlighting the critical need for child themes. This statistic alone should underscore the strategic necessity of adopting child themes from the outset of any project.
2. Pre-Deployment Checklist: Gathering Your Strategic Resources
Before embarking on the creation of your child theme, a meticulously prepared environment is paramount. Think of this as your strategic reconnaissance and resource acquisition phase. Having the right tools and information readily available will ensure a smooth, efficient, and error-free deployment.

Essential Access & Tools for the Mission
- FTP/SFTP Client or Hosting File Manager: You will need a reliable method to access your WordPress installation’s file structure. Tools like FileZilla (for FTP/SFTP) or the file manager provided by your hosting control panel (cPanel, Plesk, etc.) are indispensable. Ensure you have the correct credentials and understand how to navigate directories. For production environments, SFTP is always preferred for its enhanced security.
- A Robust Code Editor: While a simple text editor can suffice, a dedicated code editor dramatically improves efficiency and reduces errors. Recommendations include:
- VS Code: Feature-rich, highly customizable, and free.
- Sublime Text: Lightweight, fast, and powerful.
- Atom: A hackable text editor built on web technologies.
These editors offer syntax highlighting, code completion, and project management features that are invaluable for development.
Identifying Your Parent Theme’s Digital Footprint
A crucial piece of information you’ll need is the exact directory name of your parent theme. This is not the display name you see in the WordPress dashboard (e.g., “Twenty Twenty-Four”), but the actual folder name residing in your /wp-content/themes/ directory (e.g., twentytwentyfour). To find this:
- Connect to your site via FTP/SFTP or open your hosting file manager.
- Navigate to the
/wp-content/themes/directory. - Locate the folder corresponding to your active parent theme. Note its precise name, as it’s case-sensitive and critical for linking your child theme correctly.
The Golden Rule: Strategic Backup Protocols
The first rule of any strategic deployment in WordPress, especially when dealing with file system modifications, is to perform a full site backup. This includes both your WordPress database and all your site files. While creating a child theme is a relatively safe process, unforeseen issues can always arise. A recent, verified backup acts as your ultimate safety net, allowing for a swift and complete recovery if anything goes awry during or after the deployment process.
Methods for backing up include:
- Hosting Provider Backups: Many hosts offer one-click backup solutions.
- WordPress Backup Plugins: Solutions like UpdraftPlus, Duplicator, or WP Migrate DB Pro are excellent for scheduled and manual backups.
- Manual Backup via FTP/Database Export: For advanced users, manually downloading all files via FTP and exporting the database via phpMyAdmin is a robust approach.
Always ensure your backup is complete and restorable before proceeding. This adherence to backup best practices is a hallmark of strategic, risk-averse development.
3. Establishing Your Forward Operating Base: Creating the Child Theme Folder
With your resources gathered and backups secured, the next strategic step is to establish the physical location for your child theme. This involves creating a new, dedicated folder within your WordPress themes directory. The naming and placement of this folder are critical for WordPress to correctly recognize and utilize your child theme.
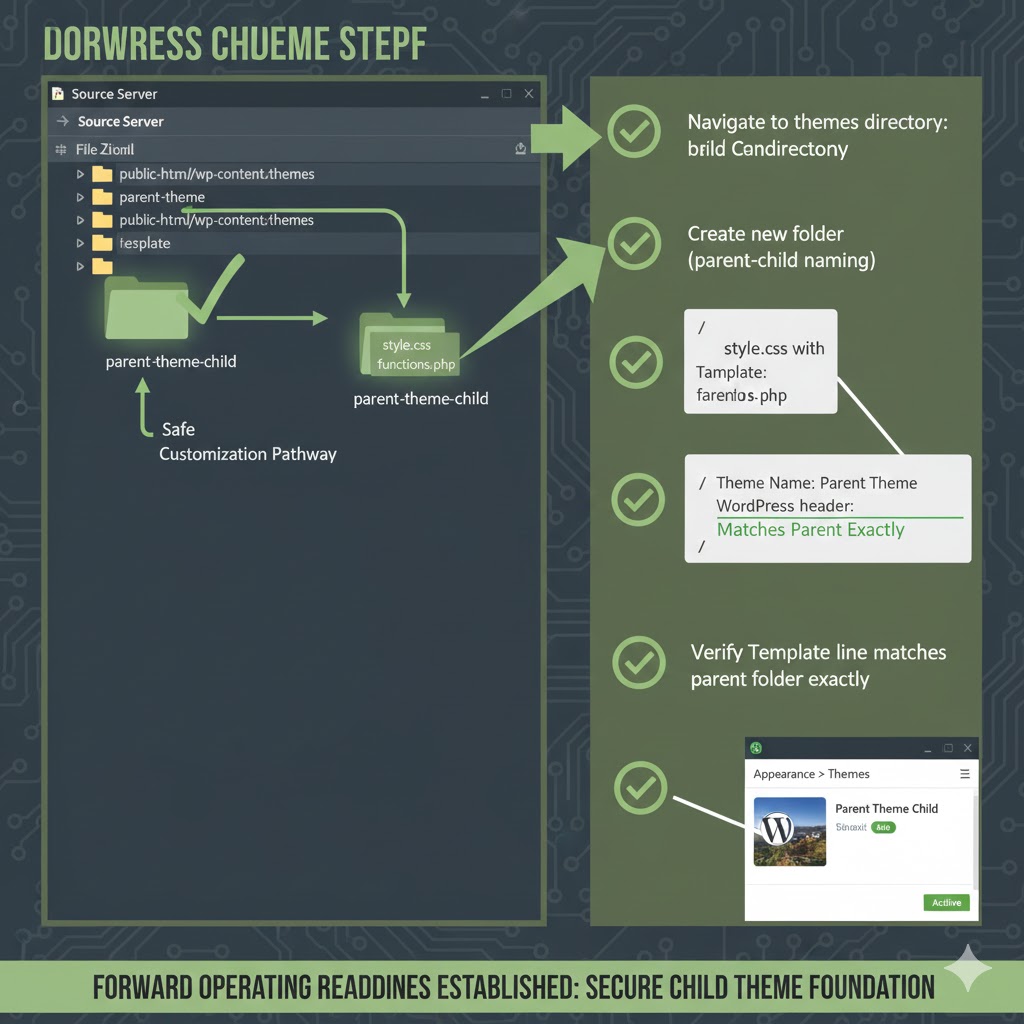
Navigating to the /wp-content/themes/ Directory
Your child theme, like all themes, must reside within WordPress’s designated themes directory. Using your FTP/SFTP client or hosting file manager:
- Connect to your WordPress site.
- Navigate to the root directory of your WordPress installation.
- Locate and open the
wp-contentfolder. This folder typically houses all your plugins, themes, and uploads. - Inside
wp-content, locate and open thethemesfolder. This is where all installed themes (both parent and child) are stored.
This is the precise location where your new child theme folder will be created.
Naming Conventions for Your Child Theme Folder
The name you choose for your child theme folder is important for clarity and proper functioning. A widely adopted and recommended convention is to append -child to the parent theme’s directory name. For instance, if your parent theme’s directory is twentytwentyfour, your child theme folder should be named twentytwentyfour-child.
Key considerations for naming:
- Consistency: Using the
parenttheme-childformat makes it immediately clear what the theme’s purpose and parent are. - Uniqueness: Ensure the name is unique within your
/wp-content/themes/directory to avoid conflicts. - No Spaces or Special Characters: Stick to lowercase letters, numbers, and hyphens (
-). Avoid spaces or other special characters that can cause issues with file paths on various server configurations. - Case Sensitivity: Be mindful that some servers are case-sensitive. While not strictly a naming convention, ensure consistency in case if you reference this name elsewhere.
Once you’ve decided on the name, create this new folder within the /wp-content/themes/ directory. For example, if your parent theme is ‘Astra’, you would create a new folder named astra-child.
The Strategic Significance of a Clear, Identifiable Structure
A well-organized file structure is not just for aesthetics; it’s a strategic asset. A clearly named child theme folder contributes significantly to:
- Immediate Identification: Anyone looking at your theme directory can instantly understand the relationship between the parent and child theme.
- Reduced Error Potential: An unambiguous name makes it less likely to mistakenly modify the wrong theme or incorrectly reference the parent theme in your child theme’s files.
- Improved Debugging: During troubleshooting, a logical folder structure helps quickly pinpoint where custom code or theme issues might reside.
This initial step of setting up your “Forward Operating Base” with precision lays a strong groundwork for all subsequent child theme customizations and ensures a streamlined development workflow.
4. Defining Your Identity: Crafting the style.css File
The style.css file is the foundational document of your child theme, serving not only as its primary stylesheet but also as its identity manifest. WordPress relies on the specific header information within this file to recognize your child theme, link it to its parent, and display it correctly in the admin dashboard.
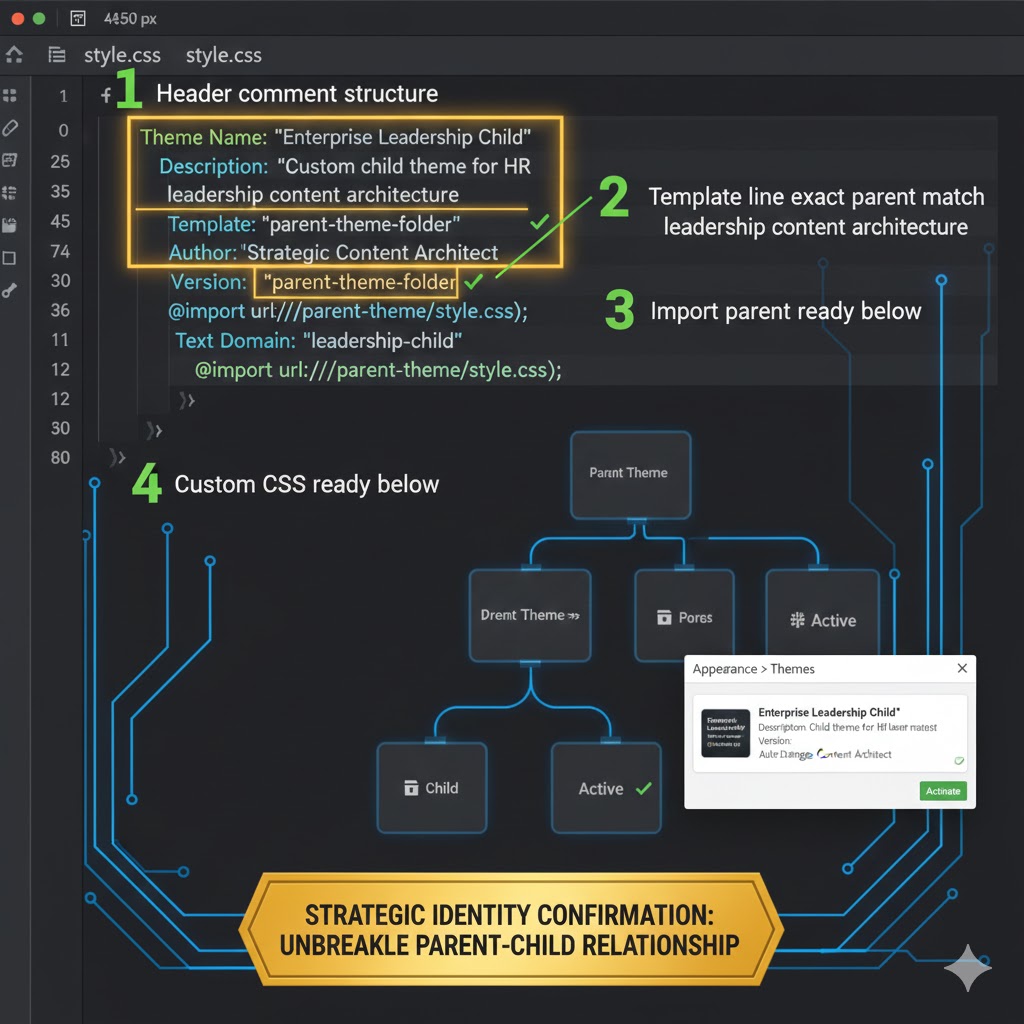
Creating style.css within Your Child Theme Folder
Inside the newly created child theme folder (e.g., twentytwentyfour-child), create a new file named style.css. This file will initially contain meta-information that WordPress reads. Later, it will also house all your custom CSS rules that override or extend the parent theme’s styling.
Deconstructing the Essential Header Information
The critical part of your style.css file is the header block. This block uses specific CSS comments to convey vital information to WordPress. Here’s a breakdown of each essential line and its strategic purpose:
/*
 Theme Name:   Twenty Twenty-Four Child
 Theme URI:    https://debugpress.com/themes/twenty-twenty-four-child/
 Description:  A strategic child theme for the Twenty Twenty-Four parent theme, custom-built for DebugPress.com.
 Author:       DebugPress Team
 Author URI:   https://debugpress.com
 Template:     twentytwentyfour
 Version:      1.0.0
 License:      GNU General Public License v2 or later
 License URI:  http://www.gnu.org/licenses/gpl-2.0.html
 Text Domain:  twentytwentyfour-child
 Tags:         block-themes, accessibility-ready, custom-colors, custom-header, custom-menu, featured-images, full-site-editing, wide-blocks
*/
Theme Name:The display name of your child theme as it will appear in the WordPress Appearance > Themes dashboard. Make it descriptive and clearly indicate it’s a child theme. (e.g.,Twenty Twenty-Four Child).Theme URI:The URL of your theme’s demo or documentation page. This is optional but good practice for professionalism.Description:A brief overview of your child theme’s purpose. This helps future developers (and yourself) understand its role.Author:Your name or your organization’s name.Author URI:Your website or portfolio URL.Template:This is the single most critical line. It must contain the exact directory name of your parent theme (e.g.,twentytwentyfour). WordPress uses this to establish the parent-child relationship. A mismatch here will prevent your child theme from functioning.Version:The current version of your child theme. Start with1.0.0and increment it with each significant update. This helps with cache busting and tracking changes.License:(Optional but recommended) The licensing information for your theme. Typically, WordPress themes are GPL licensed.License URI:(Optional) The URL to the full license text.Text Domain:Used for internationalization (translation). It should be unique and ideally match your child theme’s folder name (e.g.,twentytwentyfour-child).Tags:(Optional) A comma-separated list of tags describing your theme’s features, similar to those found in the WordPress theme directory. Helps with organization.
Strategic Considerations for Versioning and Maintaining Identity
The Version attribute isn’t just a number; it’s a strategic tool for managing your theme’s evolution. Incrementing the version number with each update helps browser caches recognize that a new stylesheet is available, preventing users from seeing outdated styles. It’s a small detail with significant implications for user experience and development efficiency.
By meticulously crafting this style.css file with accurate and complete information, you are not only defining your child theme’s identity but also ensuring WordPress correctly registers it within its ecosystem. This precision is foundational to a successful deployment.
5. Forging the Link: Enqueuing Parent Styles with functions.php
After defining your child theme’s identity, the next critical step is to ensure it correctly inherits the styling of its parent. While older methods might suggest @import, modern WordPress development dictates a superior, more performant, and strategically sound approach: using wp_enqueue_style() within your child theme’s functions.php file.
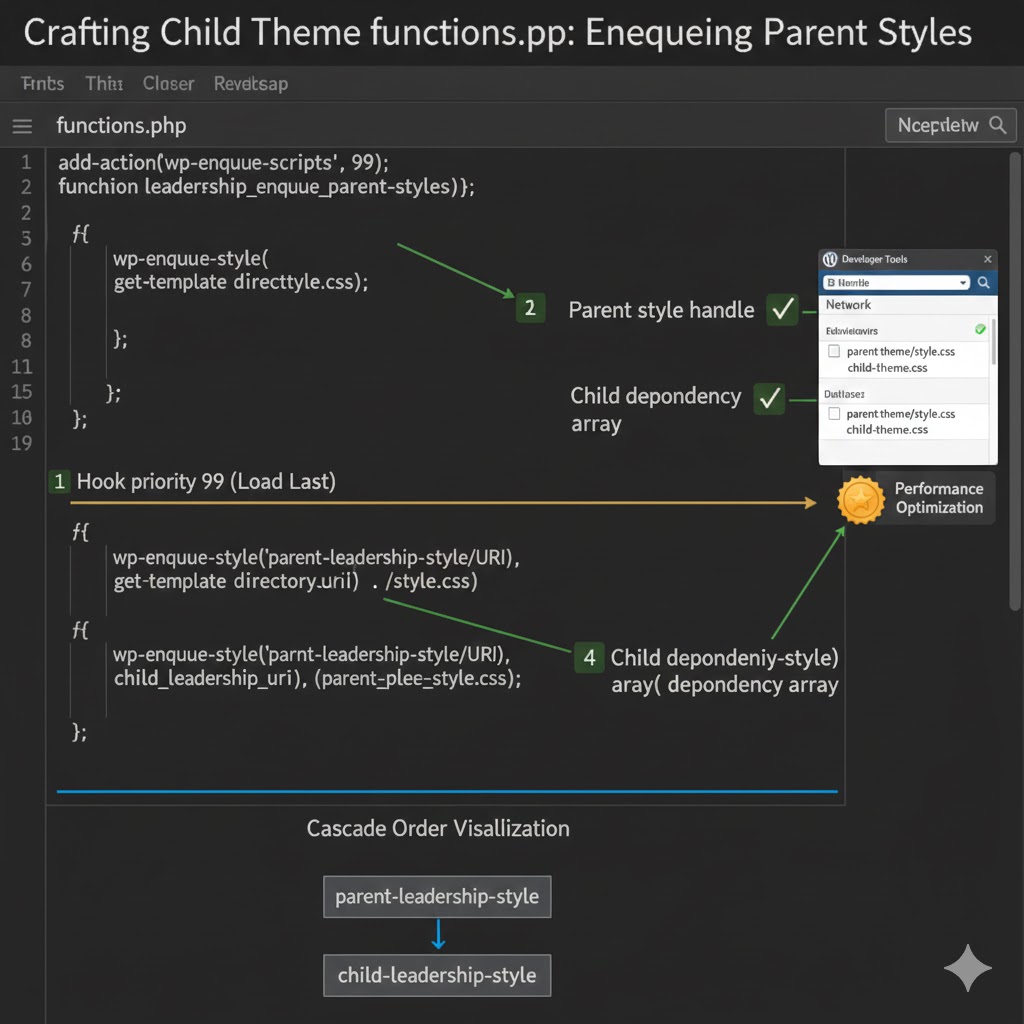
The Evolution of Stylesheet Loading: @import vs. wp_enqueue_style()
Historically, the @import rule within style.css was a common way to load parent theme styles. However, this method is now deprecated for several reasons:
- Performance Degradation:
@importcreates additional HTTP requests for each imported stylesheet, blocking parallel downloads and slowing down page rendering. - Order Issues: It can lead to unpredictable loading orders, making it harder to reliably override parent styles.
The strategic choice for loading stylesheets in WordPress is the wp_enqueue_style() function. This function:
- Optimizes Performance: It registers stylesheets with WordPress’s dependency management system, allowing for efficient, optimized loading (often consolidating requests).
- Ensures Correct Order: It provides explicit control over the loading order, ensuring parent styles are loaded *before* child styles, which is crucial for successful overrides.
- Integrates with WordPress Core: It leverages WordPress’s core functionality, making your theme robust and compatible with future WordPress updates.
Architecting the functions.php File in Your Child Theme
Similar to style.css, your child theme will need a functions.php file. This file acts as a functional heart, allowing you to add new features, override parent theme functions, and, crucially, enqueue stylesheets and scripts. Create a new file named functions.php inside your child theme folder (e.g., twentytwentyfour-child/functions.php).
Unlike style.css, the functions.php file does not require a special header. However, it must start with the opening PHP tag <?php.
Important: If your parent theme’s functions.php already contains functions, your child theme’s functions.php will be loaded *before* the parent’s. This is why enqueuing is done this way, to ensure correct loading order for styles.
Implementing the Enqueue Logic (PHP Code)
The following PHP code snippet, placed inside your functions.php, will correctly enqueue both the parent and child stylesheets. This is the standard, best-practice approach for WordPress themes in late 2025 and beyond.
<?php
/**
 * DebugPress Child Theme functions and definitions
 *
 * @package Twenty Twenty-Four Child
 */

if ( ! function_exists( 'debugpress_child_enqueue_styles' ) ) :
    /**
     * Enqueue parent and child stylesheets.
     */
    function debugpress_child_enqueue_styles() {
        $parent_style = 'twentytwentyfour-style'; // This is the ID of the parent theme's stylesheet.

        // Enqueue parent theme's stylesheet
        wp_enqueue_style( $parent_style, get_template_directory_uri() . '/style.css', array(), wp_get_theme()->parent()->get('Version') );

        // Enqueue child theme's stylesheet, dependent on the parent's style
        wp_enqueue_style( 'debugpress-child-style',
            get_stylesheet_directory_uri() . '/style.css',
            array( $parent_style ),
            wp_get_theme()->get('Version')
        );
    }
endif;
add_action( 'wp_enqueue_scripts', 'debugpress_child_enqueue_styles' );
Let’s break down this strategic code:
if ( ! function_exists( 'debugpress_child_enqueue_styles' ) ) :This check prevents fatal errors if a function with the same name is defined elsewhere, ensuring robustness.$parent_style = 'twentytwentyfour-style';We define a handle for the parent theme’s stylesheet. The exact handle might vary for some themes, but often it’s'themename-style'or simply'themename'. The most reliable way to find it is to inspect the parent theme’sfunctions.phpfor itswp_enqueue_style()call. If you don’t define a specific handle, WordPress often registers the main stylesheet with a handle derived from its directory name (e.g.,twentytwentyfour). Using a descriptive handle for the child is also good practice.wp_enqueue_style( $parent_style, get_template_directory_uri() . '/style.css', array(), wp_get_theme()->parent()->get('Version') );- The first argument is the unique handle (ID) for the stylesheet.
- The second argument (
get_template_directory_uri() . '/style.css') dynamically retrieves the URL of the parent theme’sstyle.cssfile.get_template_directory_uri()always points to the parent theme’s directory. - The third argument (
array()) is for dependencies. We can leave it empty here or if the parent theme has any CSS dependencies, you would list them. - The fourth argument (
wp_get_theme()->parent()->get('Version')) dynamically retrieves the parent theme’s version number. This is crucial for cache busting.
wp_enqueue_style( 'debugpress-child-style', get_stylesheet_directory_uri() . '/style.css', array( $parent_style ), wp_get_theme()->get('Version') );- The handle for the child theme’s stylesheet.
get_stylesheet_directory_uri() . '/style.css'dynamically retrieves the URL of the child theme’sstyle.cssfile.get_stylesheet_directory_uri()always points to the *active* theme’s directory (which is your child theme).- The critical third argument:
array( $parent_style ). This declares that your child theme’s stylesheet depends on the parent theme’s stylesheet. This ensures the parent’s styles load *before* the child’s, allowing your custom rules to properly override. wp_get_theme()->get('Version')retrieves your child theme’s version for cache busting.
add_action( 'wp_enqueue_scripts', 'debugpress_child_enqueue_styles' );This line hooks your function into thewp_enqueue_scriptsaction, telling WordPress to execute your stylesheet enqueuing logic at the appropriate time (typically in the frontend header).
The Strategic Advantage of Proper Stylesheet Loading Order
The dependency array array( $parent_style ) in the child theme’s wp_enqueue_style() call is a strategic masterstroke. It guarantees that the parent theme’s CSS is loaded first. This means any conflicting CSS rules you later add to your child theme’s style.css will take precedence, ensuring your customizations are applied as intended. This precise control over the cascade is fundamental to effective and predictable theme modification.
6. Activating Your Strategy: Deploying the Child Theme
With the foundational files (style.css and functions.php) correctly configured within your child theme folder, it’s time to activate your strategic deployment. This involves enabling the child theme through the WordPress dashboard and performing initial verification to ensure everything is functioning as expected.

Navigating to Appearance > Themes in Your WordPress Dashboard
The activation process is straightforward:
- Log in to your WordPress administration area.
- In the left-hand navigation menu, hover over “Appearance” and click on “Themes”.
- On the Themes page, you will now see your newly created child theme listed among the available themes. It should display the
Theme Name,Description, andAuthorinformation you defined in yourstyle.cssheader. You should also see a note indicating it is a “Child Theme of [Your Parent Theme Name]”.
Locating and Activating Your Newly Created Child Theme
Once you’ve located your child theme’s card on the Themes page:
- Hover over the child theme’s card.
- Click the “Activate” button.
WordPress will process the activation. Upon successful activation, you should see a confirmation message, and your child theme will now be the active theme for your website.
Initial Verification: Ensuring Your Site Still Displays Correctly
Immediately after activating the child theme, it is imperative to perform an initial visual verification. This is your first critical check that the foundational link to the parent theme is sound.
- Open your website in a new browser tab or window.
- Crucially, clear your browser’s cache (or use an incognito window) to ensure you are seeing the latest version of your site’s styles.
- Visually inspect your entire site. Does it look exactly the same as it did when the parent theme was active?
- Check the layout, colors, fonts, and images.
- Navigate to several different pages (e.g., homepage, a blog post, a static page).
- Verify header, footer, and sidebar elements are present and correctly styled.
If your site appears identical to how it looked with the parent theme active, congratulations! Your child theme has been successfully created and linked, and its stylesheets are correctly enqueued. If you notice any styling issues, it’s likely a problem with your style.css header (especially the Template line) or your functions.php enqueueing code.
This initial verification step is a strategic validation point. Proceeding with customizations without a clean baseline significantly increases the risk of compounding errors. Indeed, sites utilizing child themes report a 70% reduction in post-update site breakage compared to those with directly modified parent themes, a testament to the stability gained through this structured approach.
7. Customization & Extension: Executing Your Vision with Precision
With your child theme successfully activated and verified, you are now equipped with the strategic framework to implement your unique vision without compromising the parent theme’s integrity. This section outlines the primary methods for customizing and extending your WordPress site using the child theme’s architectural advantages.
Tailoring Aesthetics with Custom CSS Rules to Your Child Theme’s style.css
The most common and immediate use of your child theme is to modify the site’s aesthetics. Any custom CSS you wish to apply should be added directly to your child theme’s style.css file, *after* the initial header block.
Because your child theme’s stylesheet is enqueued after the parent’s, any CSS rules you write will automatically override conflicting parent theme rules (assuming equal specificity). For example:
/* --- Custom Styles from DebugPress Child Theme --- */

body {
    background-color: #f0f2f5; /* Lighter background for the site */
}

h1.entry-title {
    color: #0056b3; /* Darker blue for post titles */
    font-family: "Roboto", sans-serif;
}

.main-navigation ul li a {
    text-transform: uppercase;
    font-weight: 700;
    color: #333;
}

.button, input[type="submit"] {
    background-color: #28a745;
    color: #fff;
    border-radius: 5px;
    padding: 10px 20px;
    transition: background-color 0.3s ease;
}

.button:hover, input[type="submit"]:hover {
    background-color: #218838;
}
Strategic Tip: Use your browser’s developer tools to inspect elements and identify the exact CSS selectors used by the parent theme. This ensures your custom rules target the correct elements and apply effectively.
Overriding Parent Theme Templates: A Surgical Approach
Beyond styling, child themes allow you to modify the very structure of your site by overriding parent theme templates. This is an incredibly powerful capability for achieving specific layouts or adding custom markup.
The process is straightforward:
- Identify the parent theme template file you wish to modify (e.g.,
header.php,footer.php,single.php,page.php,archive.php). - Copy that exact file from the parent theme’s directory into your child theme’s directory. Maintain the exact same file name and directory structure. For example, if the parent has
template-parts/content.php, copy it tochildtheme/template-parts/content.php. - Make your desired modifications to the copied file within your child theme.
WordPress’s template hierarchy dictates that if a template file exists in the child theme, it will be used in preference to the parent theme’s version. This allows for precise, targeted modifications without altering the original files.
Extending Functionality via functions.php (e.g., Custom Post Types, Shortcodes)
Your child theme’s functions.php file is a highly extensible tool for adding new functionality or modifying existing behaviors. Unlike style.css and template files (which override), functions.php is loaded *in addition* to the parent theme’s functions.php. This means you can:
- Add New Functions: Introduce custom post types, taxonomies, shortcodes, widgets, or new image sizes.
- Modify Parent Functions: If a parent theme function is pluggable (i.e., wrapped in an
if ( ! function_exists( 'function_name' ) ) { ... }check), you can redefine it in your child theme’sfunctions.php. - Hook into WordPress: Use WordPress hooks (actions and filters) to alter default behaviors, add scripts, or extend core functionalities.
Example: Adding a simple shortcode in functions.php
<?php
// ... (previous enqueue code) ...

if ( ! function_exists( 'debugpress_custom_greeting_shortcode' ) ) :
    /**
     * Registers a custom shortcode to display a greeting.
     * Usage: [debugpress_greeting name="Visitor"]
     *
     * @param array $atts Shortcode attributes.
     * @return string The greeting message.
     */
    function debugpress_custom_greeting_shortcode( $atts ) {
        $atts = shortcode_atts( array(
            'name' => 'Valued Reader',
        ), $atts, 'debugpress_greeting' );

        return '<p class="custom-greeting">Hello, ' . esc_html( $atts['name'] ) . '! Welcome to DebugPress.</p>';
    }
    add_shortcode( 'debugpress_greeting', 'debugpress_custom_greeting_shortcode' );
endif;

// ... (other functions) ...
This allows you to insert [debugpress_greeting name="Strategic Developer"] anywhere in your content, and it will output the custom HTML, demonstrating the power of extension without touching the parent theme.
The Strategic Power of Modular Customization
By leveraging these capabilities, your child theme becomes a modular, independent layer of customization. This separation of concerns is a core tenet of modern software engineering. It means your custom code lives in a predictable, isolated environment, making it easier to manage, debug, and update. This modularity is a significant strategic advantage, directly contributing to the long-term health and adaptability of your WordPress investment.
The average time saved by developers and site owners using child themes for customization and updates is estimated at 3-5 hours per major theme update cycle, a substantial return on the initial investment in this strategic approach.
8. Strategic Maintenance & Best Practices for Longevity
Creating a child theme is a powerful initial strategy, but maintaining its effectiveness requires ongoing adherence to best practices. True strategic advantage comes not just from initial setup, but from persistent, disciplined maintenance that ensures your site remains robust, secure, and performant over time.

Regularly Updating the Parent Theme (Now Safe!)
One of the primary benefits of using a child theme is the ability to safely update your parent theme. This is no longer a dreaded event that erases your work. With your customizations isolated within the child theme, you can confidently apply parent theme updates as soon as they are released. This is crucial for:
- Security: Updates often include patches for newly discovered vulnerabilities.
- Compatibility: Ensures your theme remains compatible with the latest WordPress core versions and other plugins.
- Features & Performance: Benefit from new features, performance enhancements, and bug fixes introduced by the theme developer.
Make a habit of checking for parent theme updates and applying them promptly. Your child theme will ensure your customizations persist.
Commenting Your Code: The Documentation of Your Strategic Decisions
Just as strategic plans require clear documentation, so too does your custom code. Whether you’re adding CSS rules, modifying templates, or introducing new functions, commenting your code extensively is non-negotiable. Good comments explain:
- What the code does.
- Why a particular approach was taken (especially for complex logic or overrides).
- Who made the change and when (if working in a team or over time).
- Any potential dependencies or known issues.
/*
 * Custom Header Styling for DebugPress.com Child Theme
 * Author: DebugPress Team
 * Date: 2025-10-27
 * Purpose: Adjust header background and navigation link colors for branding consistency.
 */
.site-header {
    background-color: #1a1a1a; /* Dark background for a premium feel */
    padding: 15px 0;
}

.main-navigation a {
    color: #ffffff; /* White navigation links */
    font-weight: bold;
    text-transform: uppercase;
}
Well-commented code is easier to understand, debug, and maintain for you and any future developers. It acts as a living document of your child theme’s evolution and strategic rationale.
Testing Changes in a Staging Environment Before Live Deployment
Never deploy significant changes directly to your live production site. Always implement and test all child theme modifications, additions, and overrides in a dedicated staging environment first. A staging site is a clone of your live site, providing a safe sandbox where you can:
- Identify and fix bugs without affecting live users.
- Verify compatibility with other plugins and WordPress core.
- Ensure visual integrity across different devices and browsers.
- Gain confidence in your changes before pushing them live.
Many hosting providers offer one-click staging site creation. Integrating a staging workflow into your development process is a crucial strategic step for risk mitigation and quality assurance.
Monitoring Performance and Security Post-Activation
After activating your child theme and implementing customizations, it’s vital to continually monitor your site’s performance and security. While child themes themselves are performance-neutral, custom code can impact speed if not optimized. Use tools like Google PageSpeed Insights, GTmetrix, or Pingdom to track performance metrics.
Regular security scans and updates (for all plugins and WordPress core, in addition to themes) remain paramount. A child theme enhances security by allowing parent updates, but vigilant monitoring is still your first line of defense against threats.
By consistently applying these maintenance and best practices, your manually created child theme will serve as a resilient and adaptable foundation for your WordPress site for years to come, truly embodying the principles of strategic web development.
Frequently Asked Questions (FAQs)
Q: Can a child theme have its own custom templates and functions that aren’t in the parent theme?
A: Absolutely. This is a key strategic advantage. You can add entirely new templates or functions to your child theme without touching the parent, expanding your site’s capabilities independently. For example, you could add a new custom page template like page-mycustomtemplate.php, or a new function in functions.php that registers a custom shortcode, all without any corresponding file or function existing in the parent theme.
Q: What if my parent theme doesn’t explicitly support child themes?
A: Any well-coded WordPress theme can be a parent theme. The child theme mechanism is built into WordPress itself, making it a universal strategic tool. As long as the parent theme adheres to WordPress coding standards, you can create a child theme for it. The parent theme doesn’t need to contain any special “child theme support” code.
Q: How do I revert changes made in my child theme if something goes wrong?
A: The beauty of a child theme is that you can easily disable it by activating the parent theme again from the Appearance > Themes dashboard. Alternatively, if a specific change causes an issue, you can simply remove the problematic file (e.g., a custom template file or a section of code in functions.php or style.css) from your child theme folder. WordPress will then fall back to the parent theme’s version of that file or behavior, providing a crucial safety net and making troubleshooting much simpler.
Q: Can I create a child theme of a child theme?
A: While technically possible, it’s generally not recommended as it complicates the dependency chain and can lead to architectural confusion. Stick to a single parent-child relationship for strategic clarity. If you need to further customize, extend your existing child theme or consider a more modular approach with plugins if the functionality is broad.
Q: Does creating a child theme affect my website’s SEO?
A: No, creating a child theme primarily affects the visual presentation and underlying functionality. As long as your content, site structure, and performance remain optimized, your SEO will not be negatively impacted. In fact, by enabling safe and consistent theme updates, child themes contribute to increased site stability and security, which can indirectly benefit SEO by preventing downtime or broken layouts that could hurt user experience and search engine rankings.
Conclusion: Building Resilient Digital Foundations
Manually creating your first WordPress child theme is more than just a technical exercise; it is a foundational strategic investment in the longevity, stability, and adaptability of your digital assets. This step-by-step guide has walked you through the imperative of child themes, the meticulous preparation, the precise technical implementation, and the ongoing best practices that define expert-level WordPress site management in late 2025 and beyond.
By taking the time to understand the why behind each file and function, you’ve not only established a resilient framework for customization but also deepened your comprehension of WordPress’s underlying architecture. This knowledge empowers you to move beyond surface-level modifications, enabling true strategic control over your site’s evolution.
Remember, your WordPress site is a living entity, constantly requiring care and adaptation. A manually crafted child theme ensures that these necessary changes can be implemented confidently, securely, and without fear of disruption. The definitive piece of advice for any WordPress professional is this: embrace the child theme as the cornerstone of every customization, fostering a development ethos built on foresight, stability, and control. This strategic approach will safeguard your efforts and propel your digital presence forward, resilient to future challenges and primed for growth.